SmartPlan™ Floor Heating Installation Plans
Any heated floor project, whether it’s remodeling or new construction, can feel overwhelming before it even begins. The best remedy we’ve found is to start your project with a comprehensive, clear, and easy-to-follow install plan.
View Example Plans
Send us a Floor Plan
Featured Webinar
Free Electric Floor Heating Installation Plan
WarmlyYours has condensed over 25 years of radiant heating experience into our FREE, no obligation SmartPlans™ . With detailed floor plans, technical specs, and pricing, a WarmlyYours SmartPlan™ will make sure that your project starts off right and finishes strong.
What’s in a Floor Heating Install Plan?
These complimentary packages, compiled by a team of skilled engineers, include:
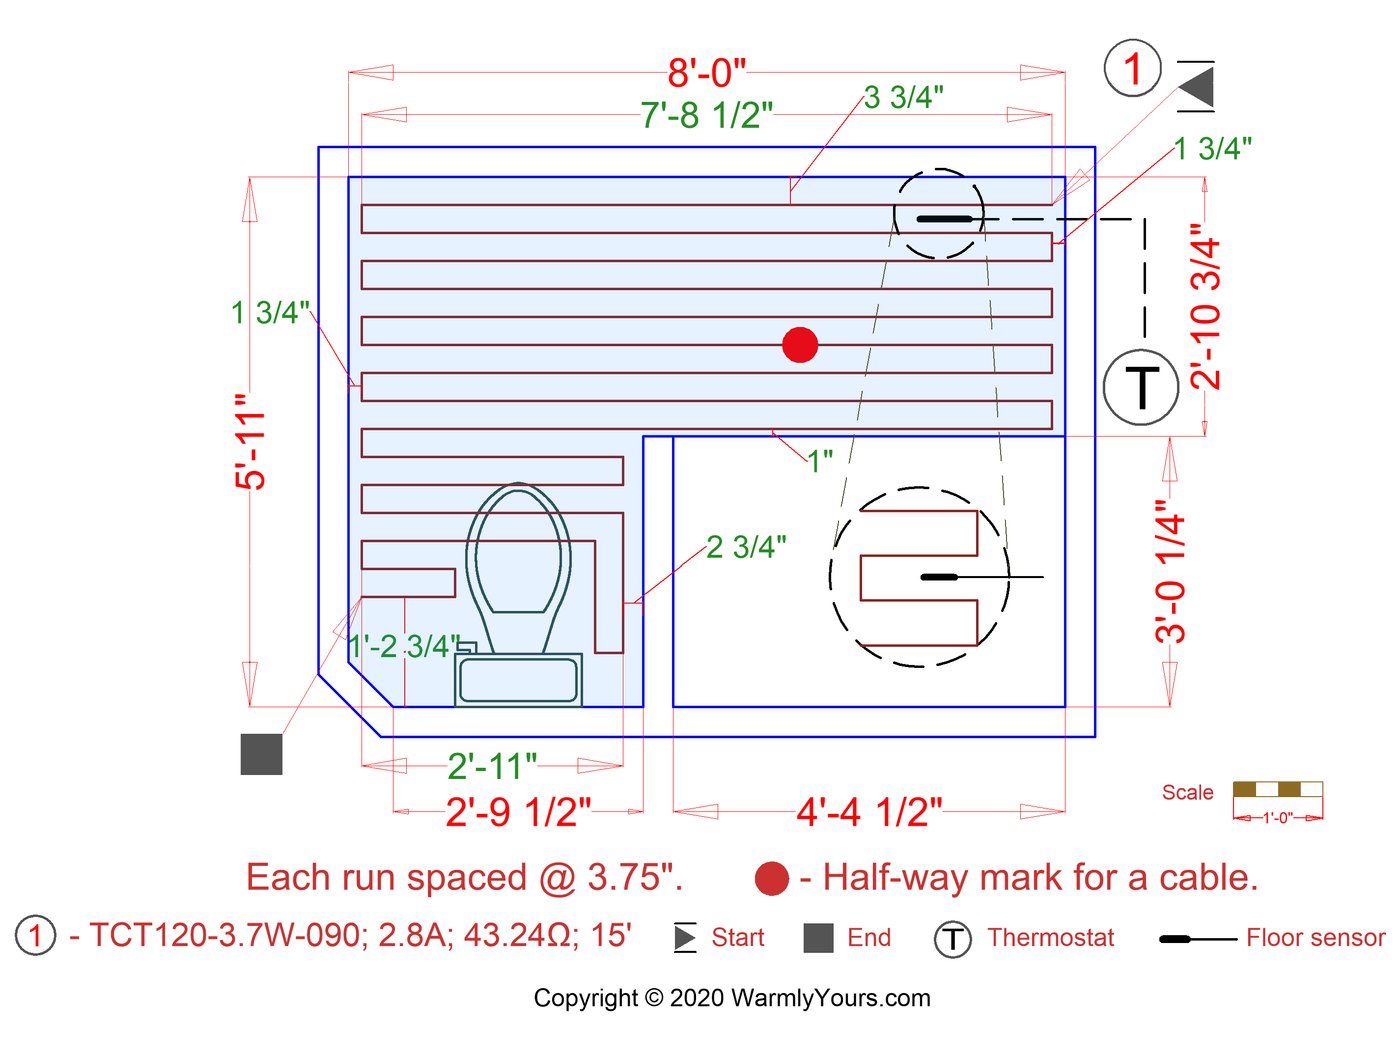
- An installation plan that gives detailed information to cut down on time and effort.
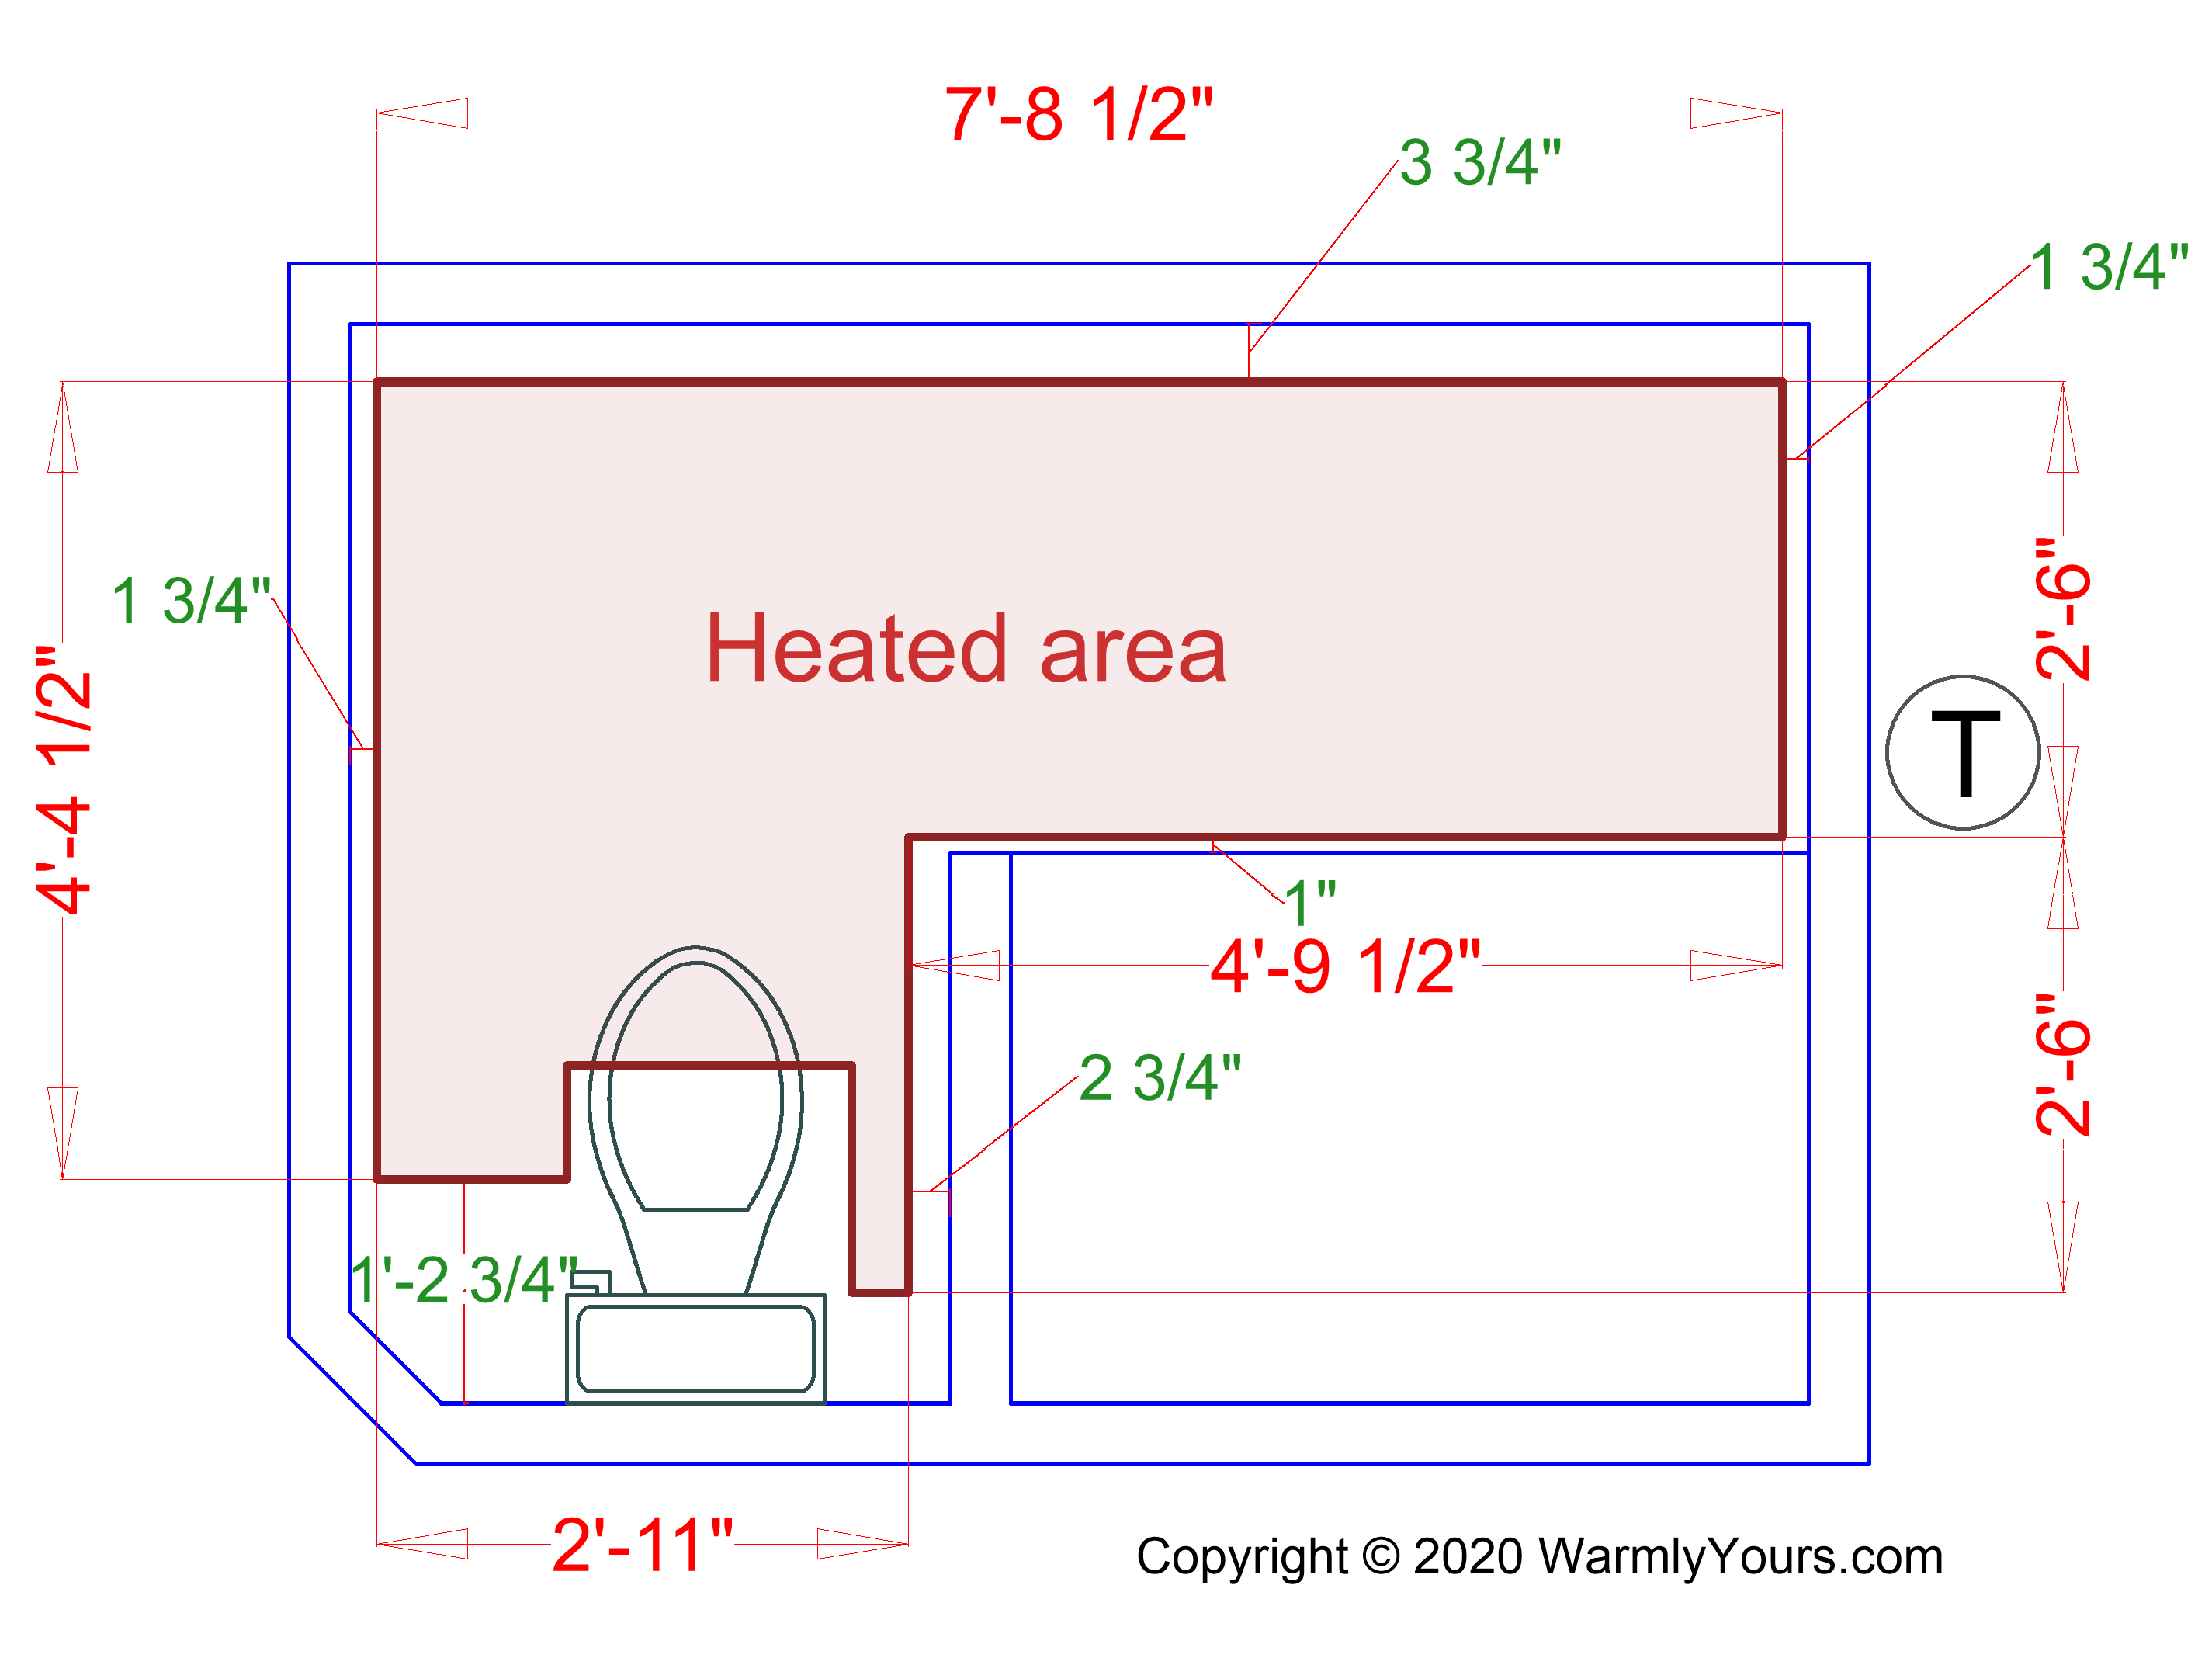
- A heated area plan to make sure the heated area will be sufficient for your needs.
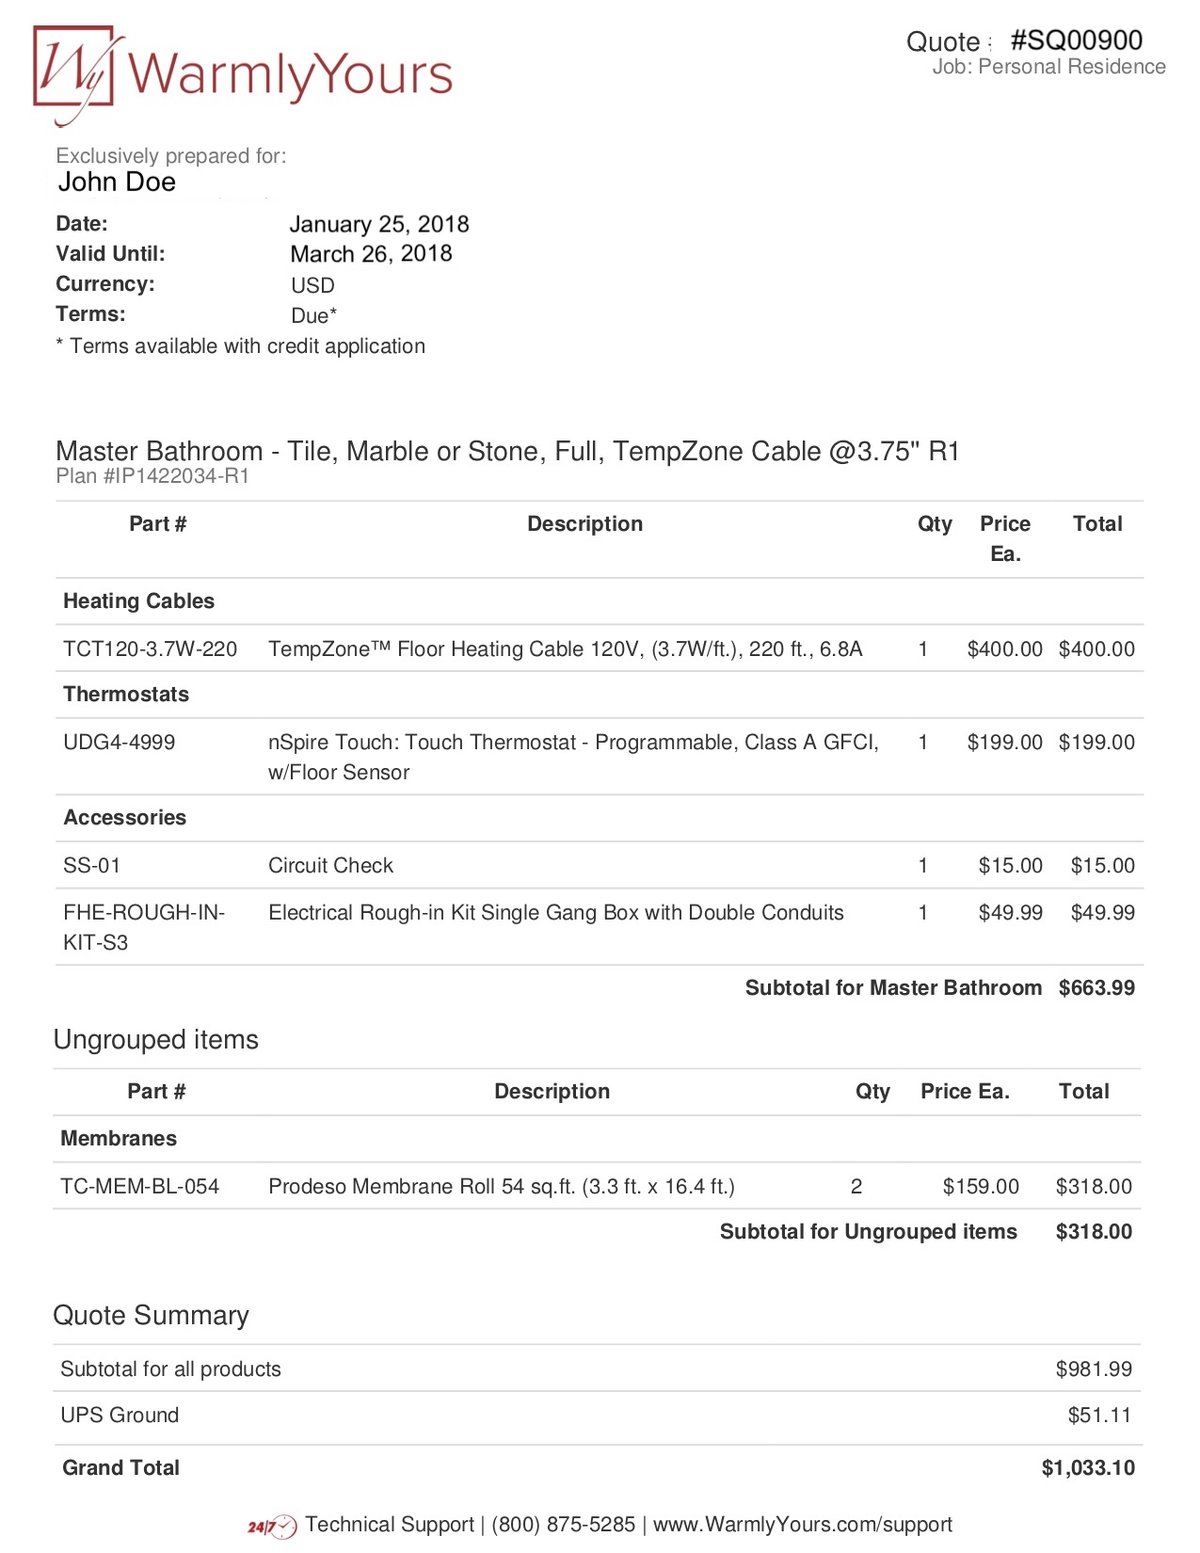
- An itemized product quote so you know the exact pricing for your project.
- An electric plan that tells you exactly what’s needed to get your system up and running.
If you want to get started you can upload a floor plan or photo of your room or design your installation plan online and you'll receive your SmartPlan™ within 1-2 business days.
Installation Plan

Heated Area Plan

Itemized Product Quote
Electrical Plan

How to Get a Free SmartPlan™
Getting a WarmlyYours SmartPlan™ is simple and ensures a smooth, hassle-free installation for your radiant heating system. Follow these easy steps to receive your customized plan at no cost:
Step 1: Provide Your Project Details
• Tell us about your space, including the room size and flooring type.
• Let us know which WarmlyYours heating system you’re considering.
Step 2: Submit a Floor Plan
Choose one of the following options:
• Upload an Existing Floor Plan - If you already have a blueprint or sketch, simply send it to us.
• Send a Sketch – A simple drawing with room dimensions is all we need.
• Use Our Online Tool – Create a digital floor plan using our easy-to-use tool.
Step 3: Our Experts Create Your SmartPlan™
• Our team will design a custom installation layout tailored to your space.
• The plan includes optimal heating element placement, wiring details, and product recommendations.
Step 4: Review & Install with Confidence
• You’ll receive your detailed SmartPlan™ with an itemized quote.
• Use this plan to guide installation, ensuring efficiency and ease.
• If you need assistance, our Radiant Experts are available 24/7 for support.
Request your FREE SmartPlan™ now and take the first step toward a warm, comfortable home!
Upload Floor Plan or Photo of Your Room- Fax it to us at (800) 408-1100
- Email the file to info@warmlyyours.com
- Use our Design Tool to create a floor plan sketch New
Advantages of a WarmlyYours SmartPlan™
-
Customized Installation Guidance The SmartPlan™ provides a detailed layout tailored to your specific space, ensuring optimal placement of heating elements. This customization facilitates a smoother installation process and maximizes system efficiency.
-
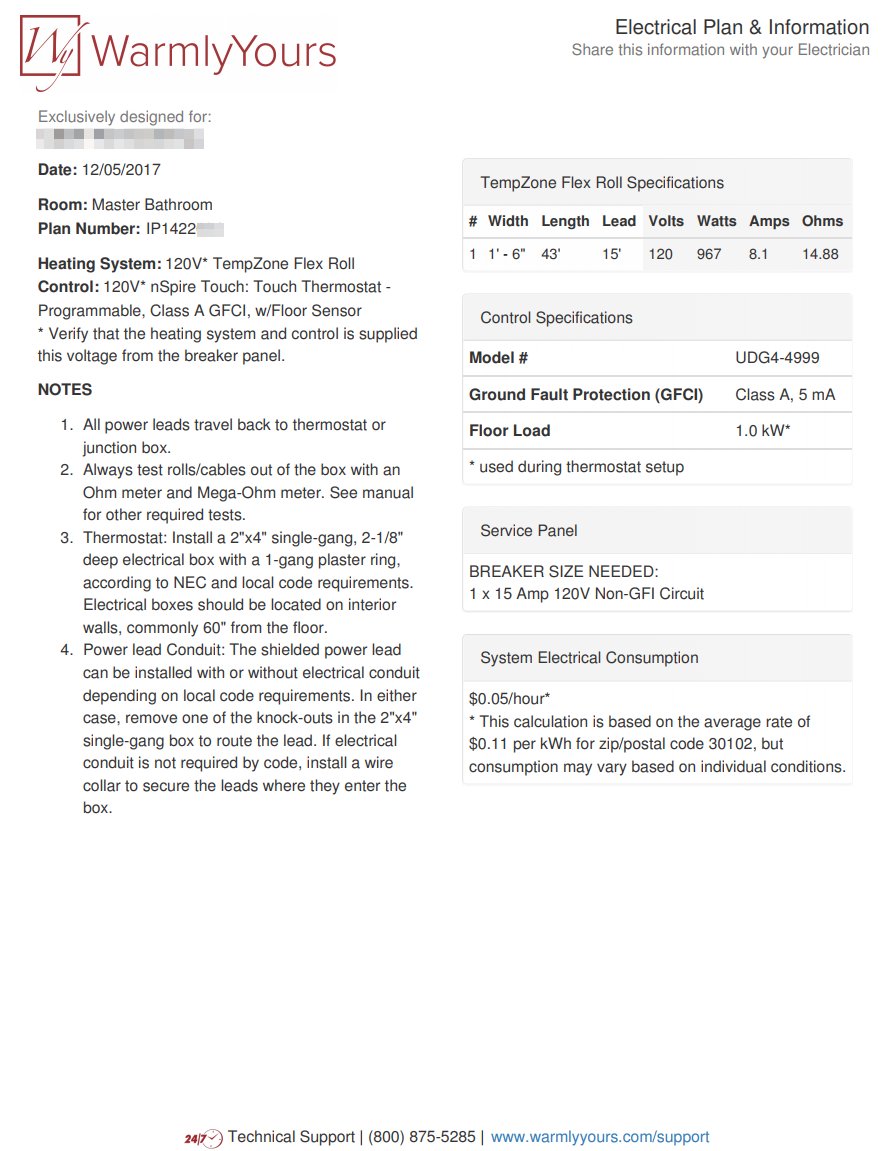
Comprehensive Electrical Specifications Accompanying electrical plans detail the necessary wiring, control installations, circuit sizes, and voltage requirements. This information is crucial for electricians to set up the system correctly and safely.
-
Accurate Product Quotation An itemized product quote is included, providing clear pricing for your project. This transparency aids in budgeting and ensures you have all components needed for installation.
-
Enhanced Project Efficiency Starting with a comprehensive plan reduces unexpected issues during installation, saving time and effort. The clear instructions and visual aids streamline the process for both DIY installers and professionals.
-
Professional Support and Troubleshooting Having a finalized installation plan on file allows WarmlyYours support teams to provide effective assistance during installation and address any troubleshooting needs in the future.
Videos
Blogs & Documents


Frequently Asked Questions
How do I work with my electrician to install WarmlyYours electric floor heating?
While WarmlyYours electric radiant floor heating systems are typically installed by your floor covering contractor, a licensed electrician is recommended for the final thermostat hook-up. With every quote, we provide an Installation Plan layout, together with an electrical plan that has all the info required for the electrician.
35 people found this helpful. Did you find this helpful? Yes NoWhat information is important for my electrician to know?
Our electrical plan page provides the most detailed information for an electrician to plan the wiring, control install, circuit size, and voltage. Typically, the most important information to start the project would be "breaker information" such as the voltage, amperage, and breaker type.
2 people found this helpful. Did you find this helpful? Yes NoWhy is control location important at this early planning stage?
Where do I find electrical requirements for my system?
The installation plan in your SmartPlan will include basic electrical information about the heating system. In addition to that, the SmartPlan will also include an electrical plan with all the necessary information to make sure you can prepare your electrical system for the new heating system.
1 person found this helpful. Did you find this helpful? Yes NoWhat if my dimensions have changed?
Dimensions change all the time, and that's ok. Just use the latest version of installation plan we provided and mark any changes or new dimensions on the document itself. Then, snap a photo and send this plan back to us for a quick redesign.
What if you've already received the product? It's not a problem. As long as the total square footage hasn't significantly changed, our design team will always do their best to redesign and use your existing product for a new layout.
Should I just provide the dimensions of the center of the room that I want to heat?
No, you should provide a sketch of the entire room, including all relevant dimensions. You should also indicate the preferred location of the thermostat/power source. Our design team will use this information to provide the best heating system possible.
1 person found this helpful. Did you find this helpful? Yes NoDoes the installation plan help with any troubleshooting or support?
How accurately should I measure the room?
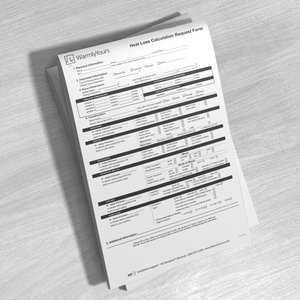
Accuracy is very important, so measure as if you are measuring for cabinets and not flooring. The more accurate the dimensions are that you supply, the more accurate your SmartPlan will be. Please indicate the size and location of any obstruction including floor vents, support posts, plumbing fixtures, cabinets, etc.
Did you find this helpful? Yes NoHow do I read all the symbols on the installation plan?
Our installation plan is designed to be as simple and easy to read as possible. It includes a legend that corresponds to all of the symbols used and relevant heating element information. In the installation plan, the start of the heating product is represented by triangle between two lines. The heating product will need to be installed by following the rest of the directional arrows. Turns and "free-form" areas are visually represented by call-outs in the installation plan. For cable heating elements, the half-way point on the plan is marked with a red circle. The end point of your heating product is always represented with a black square. The thermostat's location is indicated by a black letter “T” in a black circle.
Did you find this helpful? Yes No