Deicing Systems for Outdoor Stairs
Snow and ice can make outdoor stairs dangerous in the wintertime. Learn how installing a snow melting anti-ice system can help keep you and your loved ones safe.
What is Snow Melting?
Have you ever seen snow fall on an already warm car? It melts instantly. This is the essential idea behind snow melting systems—a heating element is embedded in your stair treads, walkway, or ramp and it melts the snow that falls on it and prevents ice accumulation. Like any outdoor surface, a set of stairs can benefit from installing an electrically heated WarmlyYours snow melting system (available in both mats and cables).
Designed to install directly in concrete, asphalt, or in mortar beneath pavers, our cable snow melting systems ensure that driveways, patios, walkways, ramps, or stairs shed ice and snow, allowing for safe passage.
Learn More About Snow MeltingWhat’s so Great about Heated Stairs?
For most of us, we use stairs so often that we hardly even think about it—until winter brings icing conditions.
When snow falls and ice begins to form, we begin to think about stairs a lot more. We worry about slipping and we stress about keeping them shoveled.
That’s why installing a WarmlyYours snow melting system in a new set of stairs can make all the difference. The ice protection system will melt the snow and ice for you, saving you from danger, stress, and even harmful ice melt chemicals.
Key Concepts for Heated Outdoor Stairs
When incorporating a snow melting system into a new set of outdoor stairs, there are few key concepts to keep in mind:
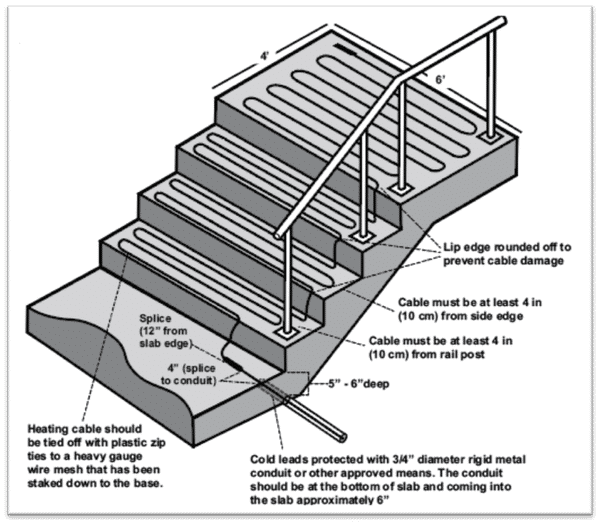
- Stair treads should be 11-12” from the front/nosing to the back/riser. This is to ensure you can get 4 passes of properly spaced heating cable in each tread.
- If your project includes stair-mounted handrails, make sure that you subtract 3” from each side to allow room for the handrail mountings.
- It’s always a good idea to call in and work with your WarmlyYours account manager to identify the best heating element for your project based on its dimensions.
The Importance of Proper Spacing
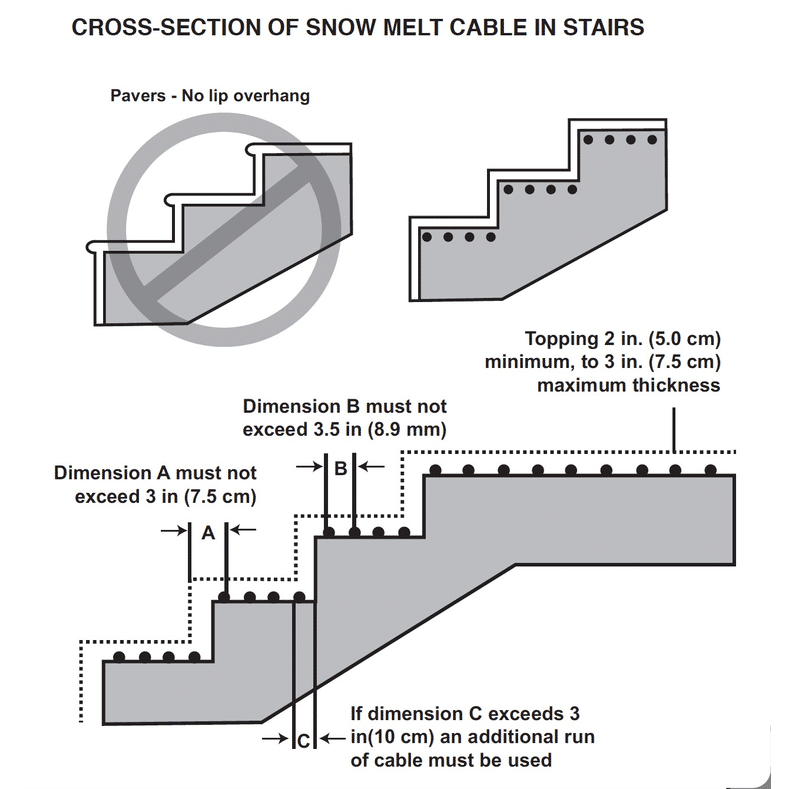
The key to a successful snow melting system is in how it’s embedded. If it’s too deep, it won’t be able to effectively melt snow or ice. If it’s too shallow (or exposed), it could overheat and fail. Make sure your heating element is 2-3” from the final surface.
The same is true of the spacing of the heating cable. Too close together and it can overheat. Too far apart (see dimensions A, B, and C in the diagram) and it won’t provide maximum snow melting.
Note: For best performance, avoid significant lip overhang from the tread nosing on your stairs (pavers only).
See the WarmlyYours Snow Melting Installation Manual for more information.
Start Smart with a Free SmartPlan
Perhaps the most important stage in installing a snow melting system is getting a good installation plan.
WarmlyYours provides a free, no-obligation SmartPlan that includes an installation plan, an electrical plan, and an itemized quote, all of which is prepared by a highly skilled team of engineers.
All you have to do to take advantage of this service is to provide WarmlyYours with a sketch of the project that includes dimensions and other relevant information, like where power will be most readily accessible.
Within typically one day of providing this information, you'll receive your free SmartPlan. The itemized quote included in your SmartPlan will also include MSRP pricing so that you can properly budget for your project.
Request a Free SmartPlanInstalling the Snow Melting System
One of the great benefits of an electric radiant heating system is the thinness of the heating element (5/16” for mats and 1/4” for cables).
The thinness of an electrical snow melting system means it has a minimal impact on the overall depth of the stairs. These snow melting systems can be used not only with concrete or pavers, but also with asphalt.
Each surface type will have a different cross section with suggested depths.
Step 1. Laying Down a Rebar Frame or Wire Mesh

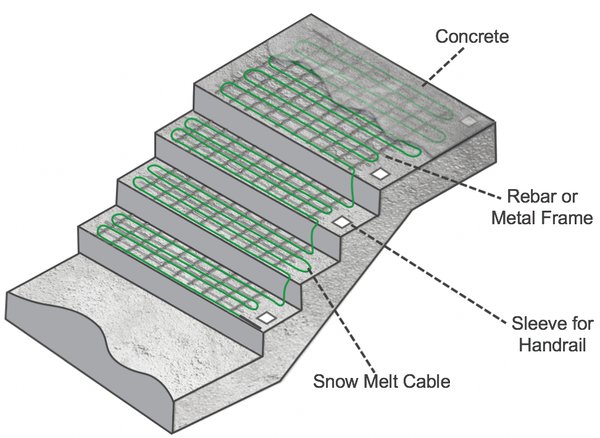
One great option for keeping the spacing of snow melting cables consistent throughout an installation is to attach them with zip-ties or wire twists to a framework like a rebar frame or wire mesh.
To make sure that your framework lies flat, it should be attached to a base layer that is 2-3” from the final surface. Make sure to avoid damaging the heating cable when you attach the framework to a base layer.
Tip: For your framework, avoid using a metal mesh that has sharp edges or burrs.
Step 2. Preparation for Handrails (if applicable)

For installations in stairs and ramps that will include handrails, it is strongly recommended that the installer put in pre-sleeves for the posts to avoid as much drilling of the surface as possible.
The heating cable must be routed around these sleeves or posts to avoid any direct contact with them. It is the responsibility of the electrician and the installer to coordinate their efforts so they avoid saw-cutting or drilling through heating cables that are no longer visible beneath the surface.
Note: Avoid allowing the heating cable, or metal framework, from making direct contact with the posts or any other metal fixtures.
Step 3. Start Laying Out the Heating Elements

As previously mentioned, maintaining the proper spacing of the heating elements is the key to a successful snow melting system.
The heating elements should be attached to the mesh using wire ties to maintain proper depth and spacing. This is also a good time to dry fit your system to make sure everything lines up properly.
Reference your custom WarmlyYours SmartPlan installation plan, provided free with every quotation, so that this process goes smoothly.
Step 4. Incorporating the Heating Cable into Risers

Since your project will most likely involve several heated stairs, you’ll need to incorporate the heating cable into the risers between each tread. There are a few different ways to do this.
The example pictured incorporated stone veneer corner pieces. This installer simply cut off the corner of the support block to create a channel for the heating cable.
Another option is to saw-cut a groove in the concrete with a concrete saw or diamond-bladed angle grinder.
The most important thing is that the heating cable is embedded in concrete or mortar. Otherwise, it could overheat and fail.
Step 5. Installing Pavers

Care must be taken by the paver installer so the mortar (or other medium) covers the heating element so that no direct contact with the pavers is made.
We recommend that at least 1” (25mm) thick mortar is poured over the heating element, but no more than 1.5” (38mm). If using sand or limestone screenings, cover to an uncompacted depth of 1.5” (38mm), leveled to grade. Avoid dropping pavers into place, as doing so may damage the heating element.
Brick and stone pavers must NOT be any thicker than 2.5” (63.5mm).
Step 6. Making Sure the Manufacturer’s Splice is Embedded in Concrete, Mortar, or Sand

The power is carried to each cable by a “cold lead,” which is connected to the heating cable via a manufacturer’s splice.
One of the most common snow melting installation mistakes that people make is leaving this splice, and some of the heating cable, outside of the concrete or sand (sometimes people leave it in the conduit or simply leave it exposed). This can cause the splice, which is half heating element, to overheat and fail.
By simply making sure that the splice is embedded, you’ll ensure that it has an appropriate medium (like concrete, sand, or stone dust) to prevent overheating.

The Finished Stairs
Once the stairs are completed, they are ready to be used. Just add snow!
Make sure to monitor your system and control throughout the first couple of snowfalls to see if any adjustments are required.
The Control for Your Snow Melting System
WarmlyYours offers a wide variety of controls for our snow melting systems - from a manual option with a timer that will only activate when you turn it on/off, to an automatic option that will turn on when it senses snow is falling.
These controls (excluding the manual and WiFi options) are able to function with the use of sensors. There are two main types of sensors: slab and aerial. Slab sensors are installed along with the heating element (but never touching it) and they can measure the conditions at the surface (slab sensors are not recommended for use with pavers). Aerial sensors are installed in the open and are actually able to detect whether or not it’s snowing.
For more information about the variety of snow melt controls and sensors available from WarmlyYours, check out this comparison chart.
Shop Controls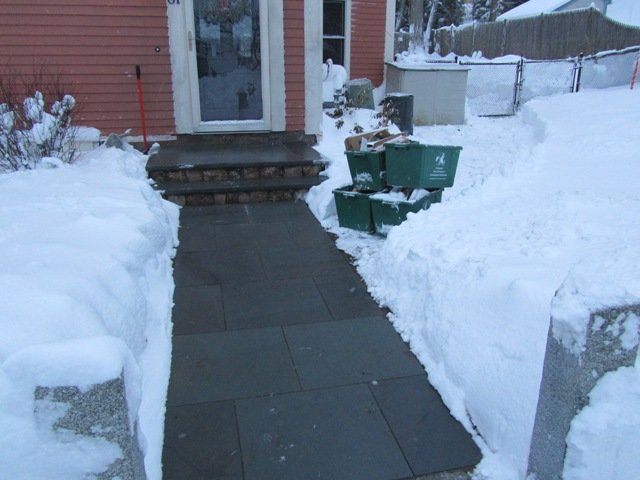
Snow Melting System in Action
As you can see, this snow melting system will keep your stairs usable, even in the dead of winter. In this picture, you may notice that the melted area is fairly wet with melted snow.

Most WarmlyYours snow melting systems will continue to run past when the snow stops falling. This will typically evaporate the water left behind, and in its place, you’ll find clean, dry pavers or concrete. Snow melting systems like this allow you to do away with chemical melting agents, which will be easier on your pets and your vehicles. It will also be much easier on your body when you can officially retire the snow shovel.
Shop Snow MeltingCompare Snow Melting System Costs
Heated Paver Walkway & Stairs
*All pricing information is MSRP and is subject to change. Operating cost calculation is based on the national average of $0.19 per kWh, but consumption may vary based on individual conditions.
