SmartPlan™ Snow Melting Installation Plans
Free Custom Install Plan • Ready in 1 Business Day • 25+ Years of Expertise

Meet Rae Radiant—Your Snow Melting Strategist
"I help homeowners, facility managers, and contractors melt away winter stress. Whether you need a clear driveway, safe steps, or an ADA-compliant ramp, my engineering team creates a custom SmartPlan™ to keep every surface ice-free."
Share your layout and we'll deliver a complete package with material list, electrical plan, wiring diagram, and quote—totally free and ready in one business day.
Your Snow Melting SmartPlan™ Journey
From first sketch to snow-free surfaces—see what happens at every step.
You Send Us Your Project
Driveways, walkways, ramps, or loading docks—share the layout, elevation changes, and obstacles. If we can see the space, we can design a melt system that keeps it clear.
Upload Your Sketch
Snap a photo of a site plan or hand-drawn sketch that includes overall dimensions plus drains, curbs, stairs, or landscaping.

Use Quote Builder
Design coverage zones digitally, compare mats vs. cables, and submit directly for an instant material estimate.
Engineering Review & Load Planning
Our in-house engineers map heating zones, determine spacing, and plan power requirements for your snow melting system. Typical turnaround: 1 business day.
Coverage Optimization
Melt paths sized for tire lanes, full-width coverage, or spot heating based on your budget and goals.
Electrical Coordination
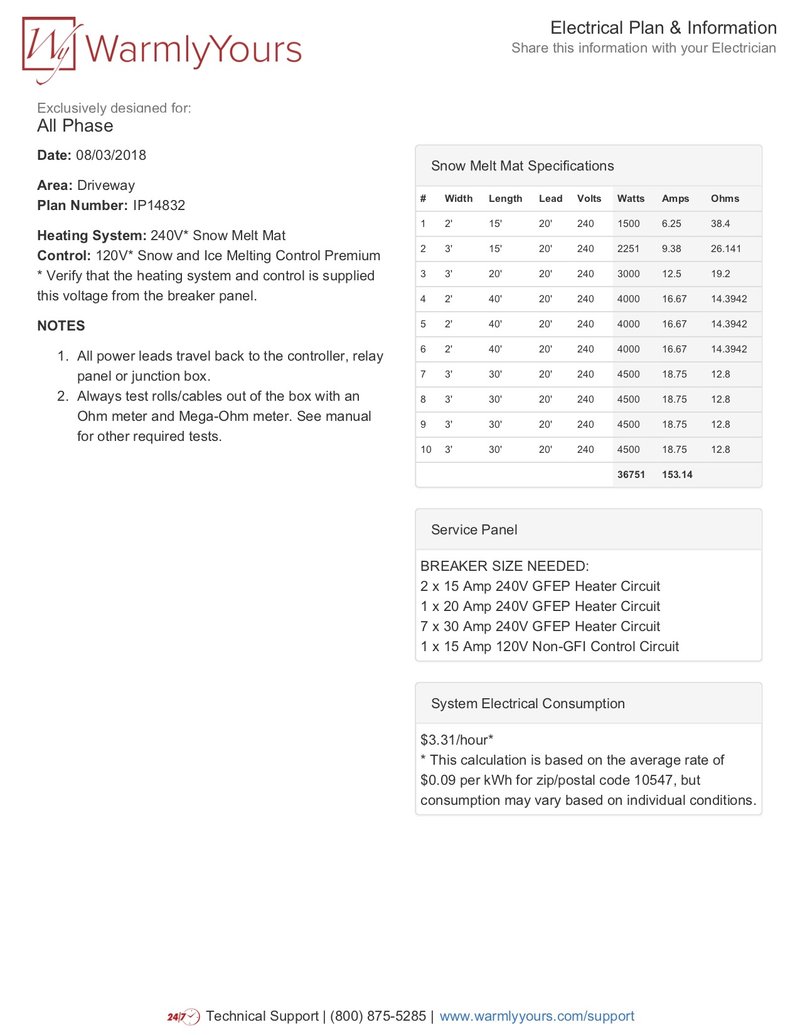
Circuit sizing, breaker counts, and contactor panel recommendations for your electrician.
Transparent Pricing
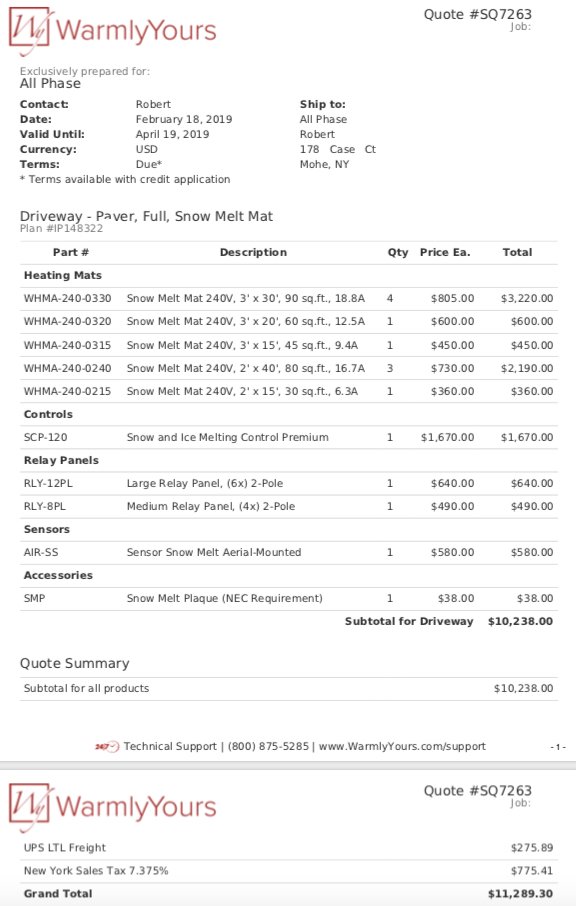
Line-by-line quote covering mats or cables, sensors, controls, and accessories.
Controls & Sensors Guidance
Recommendations for automatic snow sensors, aerial detection, or manual operation.

Rae Says
"We look at slope, drainage, and exposure so your melt system performs when the first flake hits. Every SmartPlan™ is tuned to your climate zone and utility constraints."

Receive Your Quote & SmartPlan™
Within 1 business day you’ll receive your full installation plan, electrical specs, and pricing breakdown in a single PDF package.
Rae Says
"Expect actionable instructions—from trench depths to junction boxes—so your crew can mobilize immediately. We also include alternate layouts if you ever need to scale up coverage."

What's Included in Your Snow Melting SmartPlan™?
Every SmartPlan™ is a complete, easy-to-follow installation package:
-
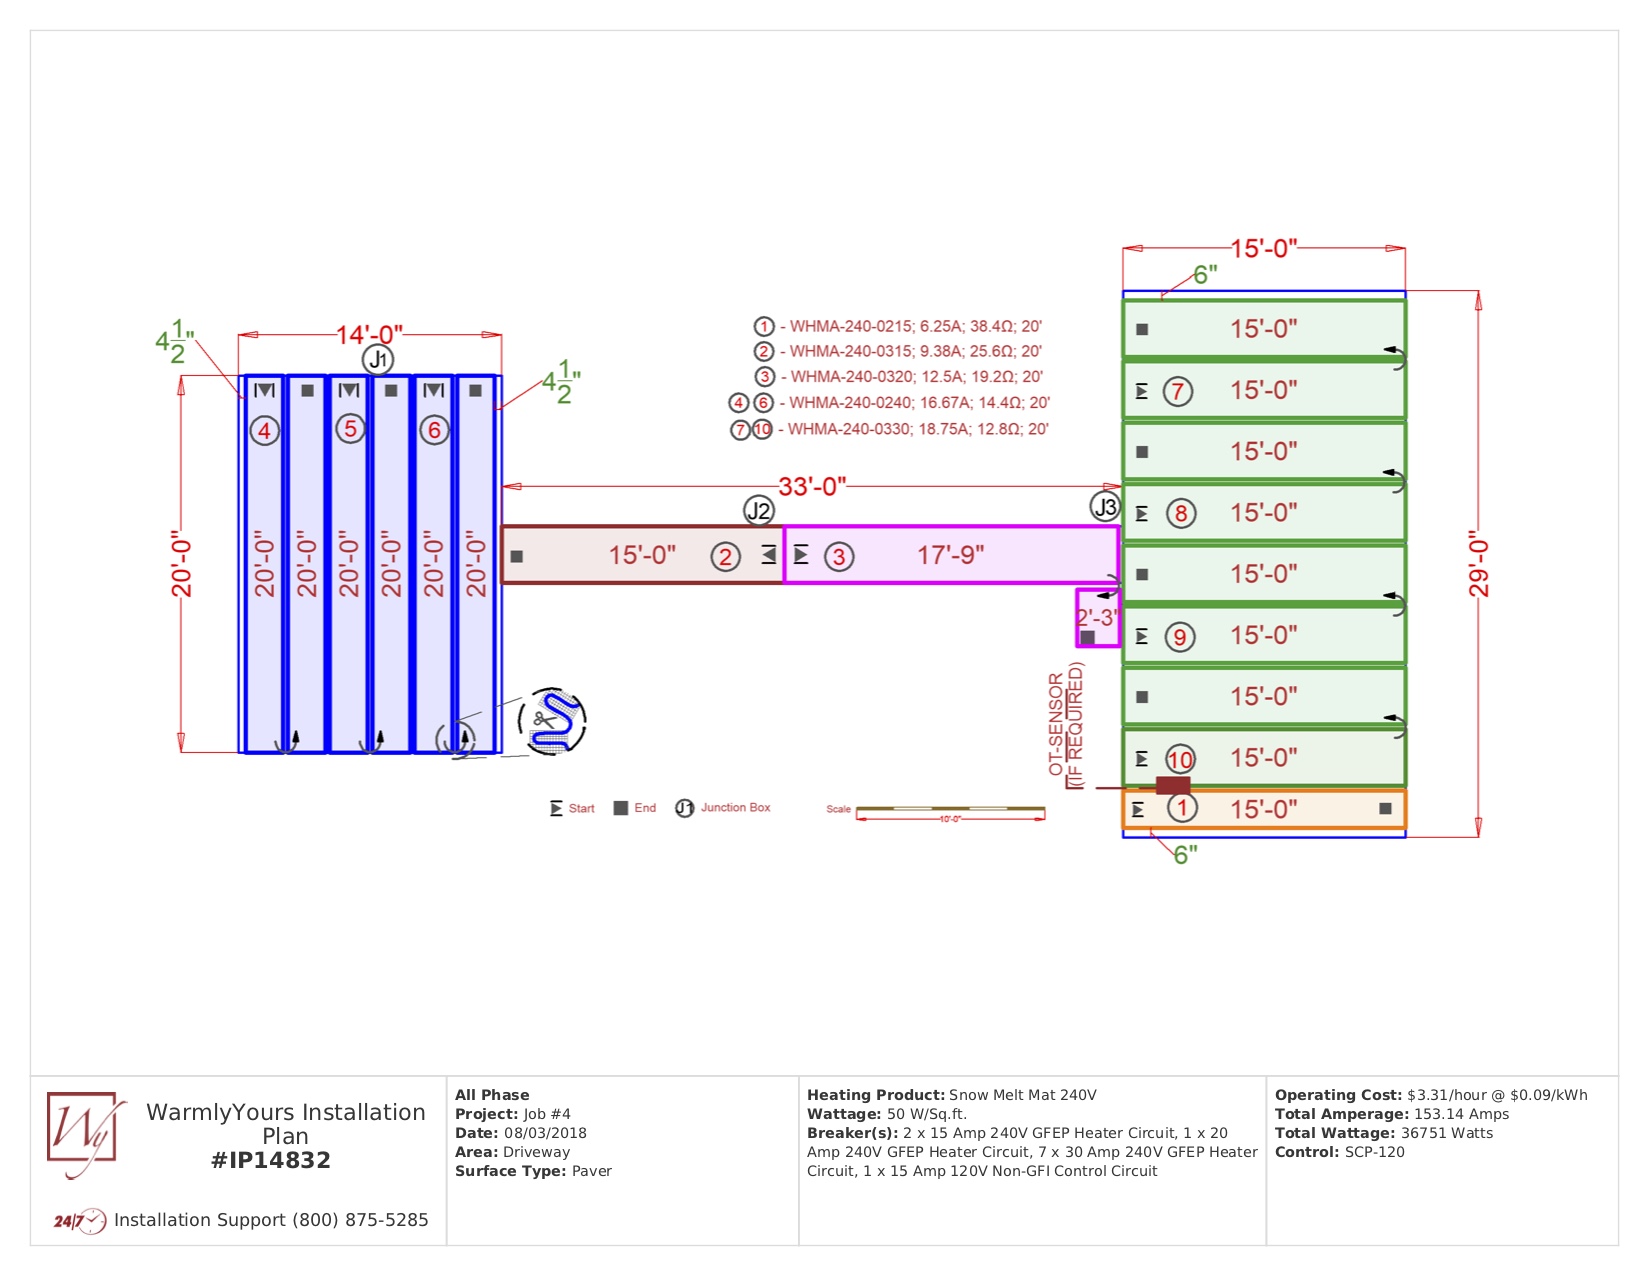
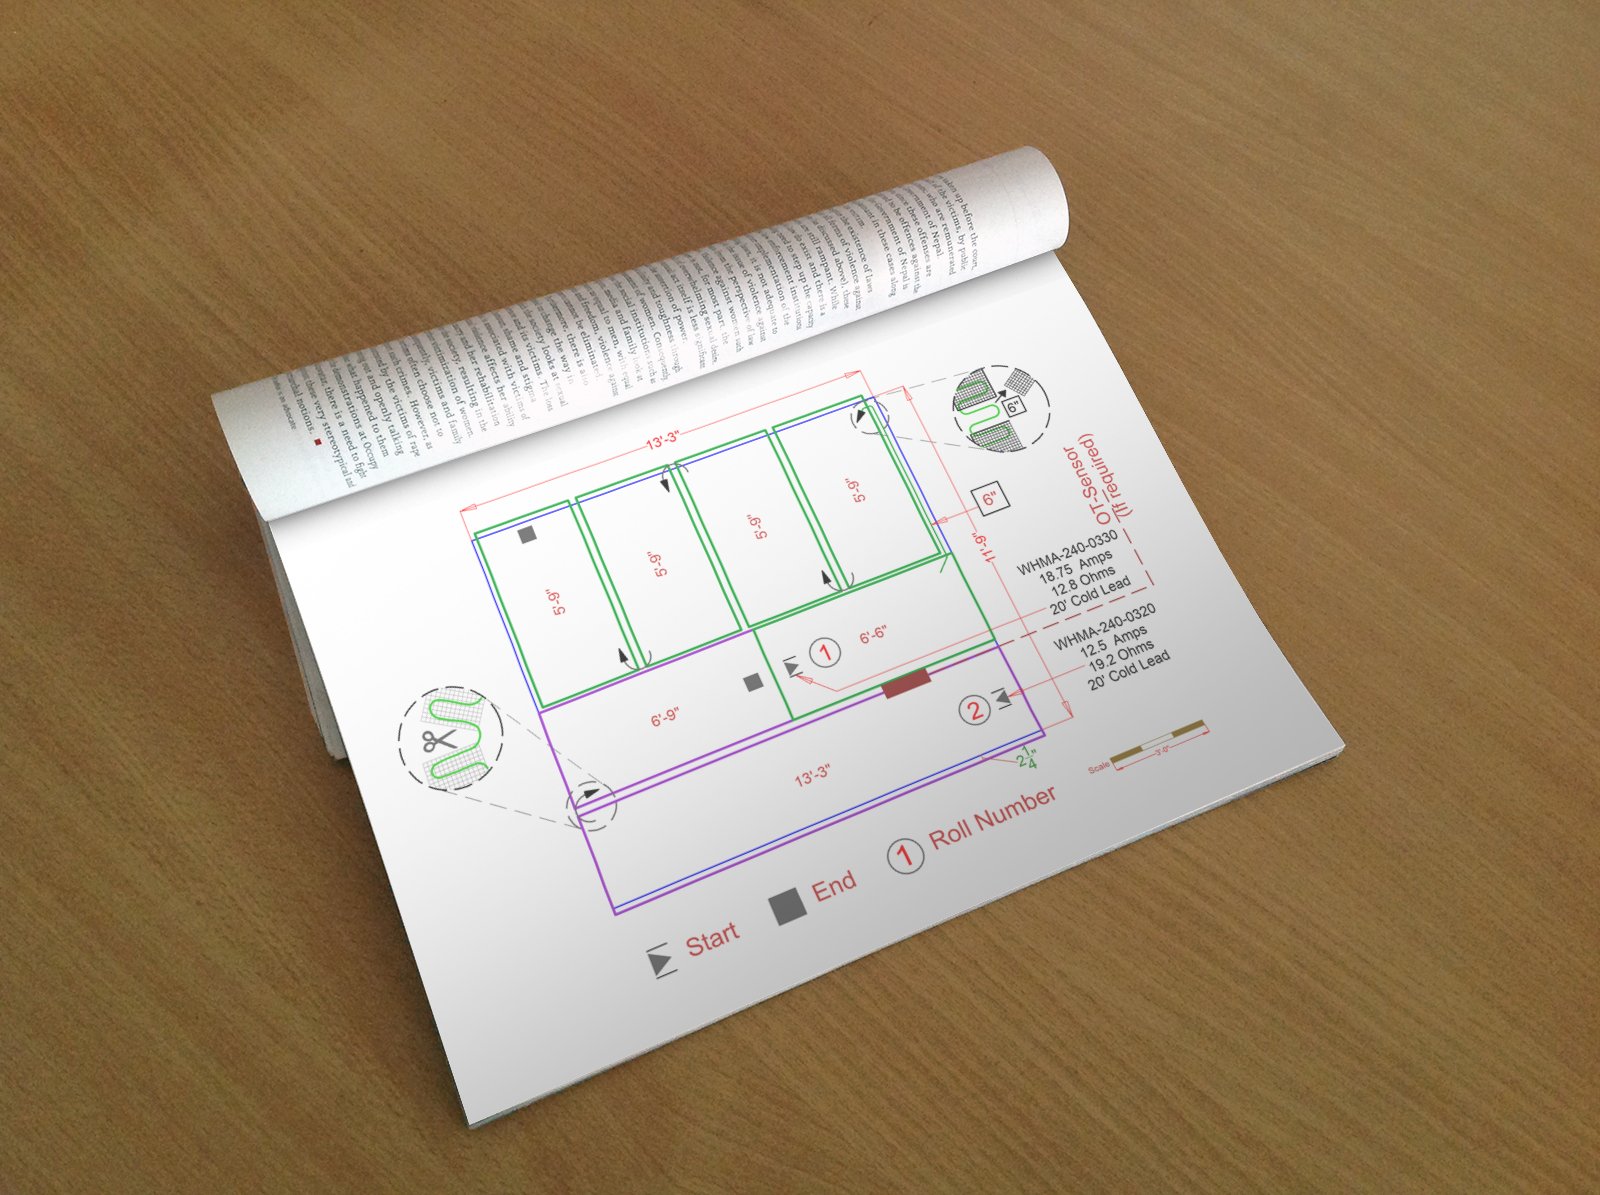
Detailed installation plan with zones, loops, and spacing.
-
Coverage layouts showing tire lanes, apron heating, or whole-surface melt.
-
Itemized product quote with transparent pricing.
-
Electrical wiring diagram covering sensor placement and control panels.
Dedicated Representative
Your assigned rep coordinates revisions, answers installer questions, and helps you place your order through our portal. Most systems ship the same day.
Rae Says
"Snow projects can move fast—especially when a storm is in the forecast. Call or email your rep anytime and we'll adjust your SmartPlan™ or rush ship components to keep the job on schedule."

Complete System Delivery
Receive clearly labeled materials, printed SmartPlans™, and installation manuals so the crew can break ground immediately.
-
Mats or cables bundled by zone plus junction boxes and leads.
-
Printed SmartPlan™ sets for field crews.
-
Installation manuals and pour checklists.
-
Warranty documentation and testing logs.
-
24/7 installation support hotline.
Rae Says
"We stage components so they match the order of operations—no guessing which zone goes where. If weather is on the horizon, we can expedite shipping to keep the pour on track."

Enjoy Clear, Safe Surfaces All Winter
Warm driveways and walkways backed by our industry-leading 25-year warranty mean fewer slips, less shoveling, and reduced liability.
Need help years down the road? Our 24/7 tech support is one call away for troubleshooting or expansions.
Rae Says
"Ice-free mornings are addictive. Once you watch the snow melt on contact, you’ll wonder how you ever lived without it—and I’ll still be here if you expand the system later!"

Ready for Snow-Free Surfaces?
Get Your Free Snow Melting SmartPlan™Free • No obligation • Expert response within 1 business day
Common Questions
Showing 6 of 11 questions
Yes, but it requires removing and replacing the surface. Snow melting systems must be embedded within the concrete, asphalt, or paver base, so retrofitting involves:
Retrofit Installation Process:
- Remove existing surface – Saw-cut and excavate the area to be heated
- Prepare base – Ensure proper compaction and drainage
- Install heating system – Lay mats or cables according to SmartPlan™
- Pour new surface – Concrete, asphalt, or paver installation
- Electrical connection – Licensed electrician completes hookup
Cost-Effective Retrofit Scenarios:
- Resurfacing projects – If you're already replacing a deteriorated driveway
- Partial coverage – Heat only tire lanes or high-traffic walkways to reduce cost
- Phased installation – Start with critical areas (steps, ADA ramps) and expand later
Alternative: Surface-Mount Systems
For areas where excavation isn't feasible, we offer surface-mount heating mats for:
- Wooden decks and stairs
- Roof valleys and gutters
- Temporary or seasonal installations
Your SmartPlan™ will evaluate your existing surface and recommend the most practical installation approach based on your goals and budget.
Snow melting system installation requires concrete/masonry work and electrical expertise, so most projects involve professional contractors. However, the level of professional help needed depends on your project scope:
You'll Need a Licensed Electrician For:
- Running power from your electrical panel to the snow melting control panel
- Installing circuit breakers, contactors, and GFCI protection
- Connecting sensors and control systems
- Ensuring compliance with local electrical codes
You May Need a Concrete Contractor For:
- New concrete or asphalt pours (embedding heating elements)
- Ensuring proper drainage and slope
- Meeting expansion joint and reinforcement requirements
DIY-Friendly Aspects:
Experienced DIYers can handle laying out and securing the heating mats or cables before the pour, following the SmartPlan™ installation guide. However, the electrical hookup must be completed by a licensed electrician.
Your SmartPlan™ includes detailed instructions for both the installation crew and electrician, making it easy to coordinate between trades.
No, professional drawings are not required. We can work with:
- Hand-drawn sketches – A simple drawing with overall dimensions, showing drains, curbs, stairs, or landscaping features
- Photos of site plans – Snap a picture of any existing plans or blueprints you have
- Digital designs – Use our online quote builder to design coverage zones and compare mats vs. cables
- Rough measurements – Even basic dimensions help us create an accurate plan
As long as we can see your space layout and understand the dimensions, we can design a snow melting system that keeps it clear. Our engineers are experienced at working with all types of documentation, from napkin sketches to CAD files.
Use the WarmlyYours Plan Finder to explore pre-designed snow melting system layouts for driveways, walkways, ramps, and outdoor stairs. Each plan includes a visual layout, dimensions, and coverage details, so you can easily select the right solution for your project.
If your space is unique, you can upload your own sketch to receive a free custom SmartPlan with a tailored installation layout and itemized quote—ensuring your snow melting system is perfectly matched to your needs.
Getting your free SmartPlan™ is quick and easy. You have two convenient options:
Option 1: Upload Your Sketch (Most Popular)
- Prepare your layout – Sketch your driveway, walkway, ramp, or loading dock with dimensions
- Include key details – Mark drains, curbs, stairs, landscaping, or obstacles
- Take a photo – Use your phone to capture the sketch or existing plans
- Upload at warmlyyours.com/quote – Fill out the simple form and attach your image
Option 2: Use Our Online Quote Builder
- Visit our quote builder
- Design your coverage zones digitally using our interactive tool
- Compare mats vs. cables and see instant material estimates
- Submit directly for engineering review and detailed SmartPlan™
What Happens Next:
- Within 1 business day: Our engineering team reviews your project
- You receive: Complete SmartPlan™ PDF with installation layout, electrical diagram, and itemized quote
- Dedicated representative assigned: Your personal contact for questions, revisions, and ordering
- Free revisions: Adjust coverage or specifications as your project evolves
No obligation, no pressure—just expert guidance to help you make an informed decision about your snow melting project.
Typical turnaround is 1 business day. Once you submit your project sketch or use our online quote builder, our engineering team reviews your layout, maps heating zones, determines spacing, and plans power requirements.
For urgent projects or when weather is approaching, we can often expedite the process. Your dedicated representative will coordinate with our engineers to prioritize your SmartPlan™ if you have time-sensitive construction deadlines.
You'll receive your complete package via email as a single PDF containing your installation plan, electrical specs, and pricing breakdown—everything you need to mobilize your crew immediately.
Operating costs depend on several factors, but snow melting systems are designed to run only when needed, making them more economical than many homeowners expect:
Key Cost Factors:
- System size – Larger heated areas use more power
- Climate zone – Snowfall frequency and duration in your region
- Coverage type – Tire lanes vs. full-surface heating
- Control method – Automatic sensors vs. manual operation
- Local electricity rates – Typically $0.10-$0.20 per kWh
Typical Operating Costs:
For a standard 400 sq. ft. driveway with automatic snow sensors:
- Per snowfall event: $5-$15 (depending on duration and intensity)
- Seasonal average: $150-$400 for areas with moderate snowfall
- Heavy snow regions: $400-$800 per season
Automatic snow sensors ensure the system only runs when precipitation is detected and temperatures are below freezing, minimizing unnecessary operation. Many customers find the cost comparable to or less than seasonal snow removal services, with the added benefits of safety, convenience, and property protection.
Your free Snow Melting SmartPlan™ includes everything you need to move forward with confidence:
- Detailed installation plan showing heating zones, loop layouts, and cable/mat spacing optimized for your climate
- Coverage layouts illustrating tire lane heating, full-surface melt, or spot heating options based on your budget and goals
- Itemized product quote with transparent pricing for mats or cables, sensors, control panels, and accessories
- Electrical wiring diagram with circuit sizing, breaker counts, sensor placement, and contactor panel recommendations for your electrician
- Material specifications including power requirements, installation depth guidelines, and drainage considerations
All plans are created by our in-house engineering team with 25+ years of experience and typically delivered within 1 business day.
Control systems determine when your snow melting system activates. Your SmartPlan™ will recommend the best option based on your project, but here are the main types:
Automatic Snow Sensors (Most Popular)
- Ground-mounted sensors detect moisture and temperature
- Fully automatic operation – System activates when snow is falling and temps are below freezing
- Energy efficient – Only runs when needed
- Best for: Driveways, walkways, and commercial areas requiring 24/7 protection
Aerial Detection Systems
- Roof-mounted sensors detect precipitation before it reaches the ground
- Pre-emptive activation – Warms surface before snow accumulates
- Best for: High-traffic commercial areas, ADA ramps, emergency access routes
Manual Controls
- Simple on/off switch or timer-based operation
- Lower upfront cost but requires monitoring weather
- Best for: Vacation homes, seasonal properties, or budget-conscious installations
Smart Controls with WiFi
- Remote monitoring and control via smartphone app
- Weather integration for predictive operation
- Usage tracking and energy reporting
- Best for: Tech-savvy homeowners who want maximum control and insights
Your SmartPlan™ will specify the recommended control system based on your climate zone, coverage area, and usage patterns.
WarmlyYours snow melting systems are backed by our industry-leading 25-year product warranty, one of the longest in the radiant heating industry.
What's Covered:
- Heating cables and mats – 25 years against manufacturing defects
- Control systems and sensors – Manufacturer warranties (typically 3-5 years)
- Free replacement of defective components during warranty period
Why Our Warranty Matters:
- Proven reliability – Over 25 years of manufacturing experience
- Rigorous testing – All systems tested before shipping
- Installation support – 24/7 tech support during installation to prevent issues
- Peace of mind – Your investment is protected for decades
Beyond the Warranty:
Even after your warranty period, our support team remains available to help with:
- Troubleshooting and diagnostics
- System expansions or modifications
- Replacement parts and accessories
- Technical guidance for repairs
Your SmartPlan™ includes warranty documentation and testing logs to ensure your system is properly registered and protected from day one.
Both systems effectively melt snow and ice, but they're designed for different installation scenarios:
Snow Melting Mats
- Pre-spaced heating cables attached to a mesh backing for consistent coverage
- Faster installation – Simply roll out and secure
- Best for: Standard rectangular areas like driveways, walkways, and patios
- Fixed sizes available in common dimensions
Snow Melting Cables
- Flexible loose cables that you space and secure according to your SmartPlan™
- Custom coverage for any shape or size
- Best for: Irregular areas, curved driveways, steps, ramps, or areas with obstacles
- More labor-intensive but provides complete design flexibility
Your SmartPlan™ will recommend the best option based on your project's layout, budget, and installation timeline. Many projects use a combination of both for optimal efficiency.

