

Installing an electric floor heating system is a great way to add comfort and efficiency to any space. However, proper installation is critical to ensure the system operates safely and effectively for years to come. Mistakes during installation, wiring, or post-installation modifications can lead to system failure, costly repairs, or inefficient performance.
In this guide, we’ll not only cover key aspects of a successful floor heating installation, but we’ll also provide solutions to the top 5 issues that homeowners and installers encounter.
• Voltage & Thermostat Capacity – Ensuring proper power management for safe and effective operation.
• Failure to Use Circuit Check & Ohmmeter – Why both tools are essential for detecting issues before they become major problems.
• Improper Installation Mistakes – Common errors that can lead to system failure and how to avoid them.
• Post-Installation Issues & Prevention – How to protect your heated floors after installation, avoiding accidental damage.
• Top 5 Floor Heating Issues & Solutions – Step-by-step troubleshooting for the most common problems, from unresponsive thermostats to uneven heating.
By following best practices and using the right tools, you can ensure a smooth installation process and long-term reliability for your floor heating system. Read on to learn how to prevent common mistakes and maximize the performance of your radiant heating system.
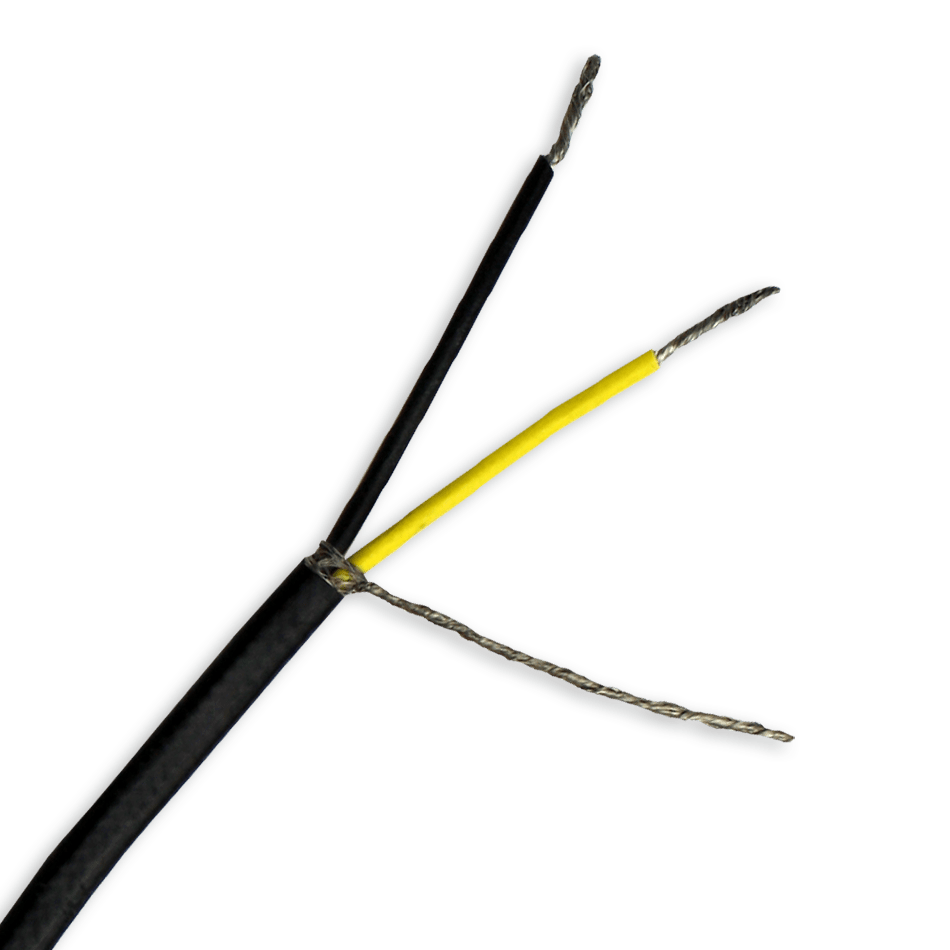
Importance of Using Both a Circuit Check Device & an Ohmmeter
Ensuring a successful floor heating installation requires using the right diagnostic tools at the right time. Two essential tools for detecting potential issues are the Circuit Check Device and the Ohmmeter. While they serve different purposes, both are crucial for preventing post-installation failures.
A Circuit Check Device continuously monitors the heating element during installation, providing real-time alerts if any damage occurs. Meanwhile, an Ohmmeter verifies the electrical resistance of the heating element at key stages, ensuring it remains within manufacturer specifications.
By using both tools together, installers can prevent costly repairs and ensure the system functions as expected. The chart below highlights the key differences between these tools and why they are both essential for a successful installation.

Circuit Check vs. Ohmmeter: Essential Tools for Floor Heating Installation
Aspect |
Circuit Check Device |
Ohmmeter |
Primary Function |
Monitors the heating element for real-time damage during installation. |
Measures the electrical resistance of the heating element to verify integrity and continuity. |
Usage Timing |
Continuously used throughout the installation process to provide immediate alerts if the heating element is compromised. |
Utilized at specific stages: before installation, after laying the heating element, and after floor covering installation. |
Alert Mechanism |
Emits audible alarm upon detecting damage, allowing for immediate corrective actions. |
Provides a resistance reading; deviations from manufacturer specifications indicate potential issues. |
Detection Capability |
Identifies immediate physical damage such as open heating circuit or shorts to the heating element during handling and installation. |
Can help locate electrical issues like breaks in the circuit or short circuits that may not be immediately apparent. |
Importance in Installation |
Serves as a preventive tool to ensure the heating element remains intact during installation, reducing the risk of post-installation failures. |
Confirms the overall health and functionality of the heating element, ensuring it meets required specifications before and after installation. |
Avoiding Common Installation Mistakes for Floor Heating Systems
Proper installation is essential for ensuring the safety, efficiency, and longevity of an electric floor heating system. Improper installation practices can lead to overheating, system failure, or uneven flooring, resulting in costly repairs or replacements.
To prevent these issues, installers must follow manufacturer guidelines and industry best practices when embedding heating elements, placing splices correctly, and avoiding hazardous mistakes such as overlapping cables or installing heating elements under permanent fixtures.
The chart below highlights some of the most common installation mistakes, the risks they pose, and the best ways to prevent them, ensuring a smooth and successful floor heating installation.
Common Floor Heating Installation Mistakes & How to Prevent Them
Issue |
Risk |
Prevention |
Splice Installed Uncovered in a Wall |
Against code; can overheat and fail |
Embed the splice in thinset or self-leveling cement under flooring. |
Improper Placement Leading to Uneven Flooring |
Causes uneven flooring due to the splice’s thickness |
Create a notch in the subfloor to accommodate the splice, ensuring a smooth and level floor surface. |
Insufficient Embedding in Mortar |
Inadequate protection and potential overheating |
Fully embed the splice in mortar, thin-set, or self-leveling compound. |
Overlapping Heating Cables |
Dangerous overheating can occur, resulting in product failure |
Ensure heating cables do not overlap or touch each other during installation. |
Installing Under Permanent Fixtures |
Can cause overheating as heat cannot dissipate properly. Does not comply with the National Electric Code |
Avoid installing heating cables under permanent fixtures like cabinets or built-ins. |
Understanding Voltage & Thermostat Capacity for Floor Heating Systems
Selecting the correct voltage and thermostat capacity is essential for a safe and efficient floor heating installation. Each thermostat has an amperage limit, and exceeding this can cause overheating, system failure, or damage. Similarly, ensuring the correct voltage connection prevents issues such as overheating, insufficient heating, or thermostat malfunction.
For larger areas, power modules can be used to expand the thermostat’s capacity, allowing it to safely manage additional heating loads.
The chart below outlines the key considerations for thermostat capacity, voltage matching, and potential issues to help ensure a successful installation.
Voltage & Thermostat Capacity: Key Considerations for Safe Installation
Consideration |
Details |
Thermostat Capacity |
Amperage Limit: Most underfloor heating thermostats are rated for a maximum load of 15 amps. Exceeding this limit can cause overheating and potential failure of the control. |
Square Footage: 120V vs. 240V |
120V Systems: A thermostat can typically control up to 120 sq. ft. of heating mats or cables. 240V Systems: A thermostat can typically control up to 240 sq. ft. of heating mats or cables. |
Correct Voltage Connection |
Voltage Matching: Ensure heating elements are connected to the voltage specified on the heating element label (e.g., 120V or 240V). Incorrect voltage can lead to overheating or insufficient heating. |
Potential Issues with Incorrect Voltage |
Overheating: Connecting a 120V heating element to a 240V supply voltage can cause excessive heat, leading to failure or fire hazards. Insufficient Heating: Connecting a 240V product to 120V supply voltage can result in inadequate heating performance. |
Use of Power Modules |
Load Expansion: If the combined load of the heating elements exceeds the thermostat’s capacity, power modules can be used to safely manage the additional load. |
Post Floor Heating Installation Issues & How to Prevent Them
Even after a successful floor heating installation, certain post-installation activities can accidentally damage the heating elements, leading to system failure or costly repairs. Two of the most common issues are damaging heating elements while cleaning grout lines and drilling into the floor after installation.
To protect the integrity of your heated floor, it’s important to follow best practices, such as cleaning grout lines while the thinset is still wet and carefully planning for post-installation penetrations like door stops and transitions.
The chart below highlights common post-installation issues, their risks, and how to prevent them to ensure the longevity of your heated flooring system.
Common Post-Installation Mistakes & Prevention Strategies
Issue |
Description |
Prevention |
Grout Lines |
Accidentally damaging the heating element while cleaning grout lines. |
Always clean grout lines while the thinset is still wet to minimize the possibility of damage to the heating elements. |
Post-Installation Penetrations |
Drilling into the floor after installation can damage embedded heating elements, leading to system failure. |
Plan ahead for door stops, transitions, and any necessary drilling to avoid contact with heating elements. Before drilling, consult installation plans to identify safe areas, and use appropriate tools to prevent accidental damage. |
Issue 1: The Thermostat is Blank
If your floor heating thermostat does not light up or appears to be unresponsive, there are a few possible causes. The most common reasons include a nuisance trip from a GFCI breaker or a thermostat failure due to age.
Steps to Diagnose the Issue:
1. Check the Circuit Breaker – Ensure that the breaker supplying power to the thermostat is not a GFCI breaker, as GFCI circuits can sometimes trip unnecessarily, cutting power to the thermostat.
2. Test for Voltage at the Thermostat – Remove the thermostat from the wall and use a voltage tester to check if power is reaching the thermostat’s wiring.
If no power is detected, check your electrical panel and breaker settings.
If power is present, the thermostat has likely failed and needs replacement.
3. Verify Electrical Panel Capacity – Before installing your floor-heating system, ensure your electrical panel has sufficient capacity to handle the system’s power requirements.
By following these troubleshooting steps, you can quickly determine whether the issue is related to the breaker, wiring, or thermostat failure, allowing for an efficient resolution.
Issue 2: Thermostat Displays “GFI ERROR”
A GFI ERROR message on your thermostat indicates that the ground fault protection has been triggered, which may be due to a wiring issue, a fault in the heating element, or an incorrect breaker type. To diagnose and resolve this issue, follow these steps:
Troubleshooting Steps:
1. Test the Floor Heating System with an Ohmmeter – Check the resistance readings to ensure they match the manufacturer’s specifications. If the readings are abnormal, there may be a fault in the heating element.
2. Verify the Circuit Breaker Type – Ensure that the system is not connected to a GFCI breaker, as the thermostat already has built-in ground fault protection. A GFCI breaker can cause unnecessary tripping, leading to the error message.
3. Reset the Thermostat – Power down the thermostat and cycle power at the breaker to reset the system. If the error persists, further troubleshooting may be required.
By carefully following these steps, you can identify the root cause of the GFI error and restore your floor heating system to proper operation.
Issue 3: Uneven or Inconsistent Heat Distribution
If you’re noticing that some areas of the floor are warmer than others, your heating cable was likely not spaced correctly. On the other hand, if the entire floor seems colder some days than others, you’re probably dealing with a lack of insulation.
If some areas of your floor feel warmer than others, or if the entire floor seems colder on certain days, there are a few possible causes. The most common reasons include incorrect cable spacing during installation or insufficient insulation, particularly when heating over a concrete slab.
Troubleshooting & Solutions
1. Verify Heating Cable Placement – Uneven heat distribution often results from improper spacing of the heating cables.
- WarmlyYours provides a custom installation plan with every system, showing the correct cable layout for even heat distribution.
- Always follow the plan closely to ensure consistent warmth throughout the space.
2. Check for Proper Insulation – If the entire floor feels inconsistently warm or cool on different days, a lack of insulation could be the issue.
- If installing on a concrete slab, heat can be absorbed into the slab rather than radiating upward into the floor.
- To prevent heat loss, always use ThermalSheet underlayment, which acts as a barrier, ensuring the warmth travels upward instead of being absorbed into the concrete.
3. Use a Thermal Imaging Camera – If you suspect installation issues, rent a thermal camera locally or from WarmlyYours to visually confirm how the heating wires were installed. This allows you to identify any gaps or incorrect spacing that could be affecting performance.
By ensuring proper cable spacing and insulation, you can maximize the efficiency of your heated flooring system and enjoy consistent warmth across the entire floor.
Issue 4: Floor Heating Isn’t Heating
If your heated floor isn’t warming up, the issue could be with either the floor heating system or the thermostat. Even if the thermostat appears to be functioning, it may not be sending power to the heating system. Follow these troubleshooting steps to identify and resolve the problem.
Troubleshooting & Solutions
1. Determine if the Issue is with the Floor or the Thermostat
- Use an ohmmeter to test the heating system.
- If the floor tests within the expected resistance range, the heating element is functioning correctly, and the issue is likely with the thermostat.
Even if the thermostat appears to be working, it may have failed internally and needs to be replaced.
2. Check the Thermostat Settings
- Go into the thermostat menu and check whether it is set to room mode or floor mode.
- If it is in room mode, switch it to floor mode, which ensures the system is operating based on floor temperature rather than ambient air temperature.
3. Check for Dual Sensors
- If two floor sensors are connected to the thermostat, this can cause issues with temperature readings.
- Try removing one sensor and testing the system again to see if it resolves the issue.
By following these steps, you can quickly determine whether the issue is with the thermostat or the floor heating system, allowing for an efficient fix and restoring warmth to your floor.
Issue 5: Floor Was Installed but Never Heated
If a customer’s heated floor was installed but has never worked, the problem is likely due to incorrect wiring or a voltage mismatch. One of the most common mistakes is supplying 240V power to a 120V heating element, which can cause immediate system failure.
Troubleshooting & Solutions
1. Check for a Voltage Mismatch
Verify that the voltage of the heating element matches the supply voltage.
If a 120V heating element was connected to a 240V power supply, it may have overheated and failed.
In this case, you will need a TBS Kit and a thermal imaging camera to locate the damaged spot.
2. Confirm Proper Wiring
Incorrect wiring can prevent the system from operating properly.
Refer to the OJ wiring diagram for TempZone to verify correct connections: 📄 OJ Thermostat Wiring Diagram for TempZone
By confirming the correct voltage and wiring, you can identify the source of the problem and take the necessary steps to restore functionality to the heating system. If further troubleshooting is needed, WarmlyYours technical support can provide additional guidance and tools to pinpoint and resolve the issue.
If you have questions such as “How do I know if my underfloor heating is working?”, “How do you troubleshoot radiant heat?”, or “How do you adjust a thermostat on a heated floor?”, our customer service and 24/7 technical support teams are here to help. Feel free to contact us anytime at 1-800-875-5285 for expert assistance or by using this form.
Related Posts


Like this post? Subscribe for regular updates
take off of hold status
That's a good point! You're correct that a potential issue may be the result of a thermostat being left in "hold status", which, in certain situations, can cause the system to "overwork".
Installed device does not have a brand name. I have no instructions. It has been off for years..came on suddenly but pushing buttons not much happens and there is no off option. Red lights came on upper left corner. Worried. What to do?
We're really sorry to hear that! From the details you've provided, it doesn't sound like it's probably a WarmlyYours system but we'd still love to be able to help in anyway. Give us a call at 1-800-875-5285 and our Radiant Experts can try to help troubleshoot the issue (or at the very least, point you in the direction of some good resources). One thing you can do in the meantime is to reset the breaker to reset the red light (this usually means a tripped Ground Fault) and then try to activate the heat by using the "increase" button. But giving us a call is probably the best bet.
The system works the last few years. This year, however, the heat won't come on.
We're very sorry to hear that you're having issues but we're also here to help in any way we can! The best first step is to give us a call at 1-800-875-5285 and our technical support team can try to help you identify the issue with the heating system.
I installed a 15 sq ft electric heating mat in a basement bathroom. It is a 120 volt system. The thermostat puts power (120 V) to the mat but the floor never get above 66F no matter what the target point is set at. The indicator shows full power to the mat and I verified that. I did not insulate the floor but I have a different mfg mat in my basement bath and the floor is nice and toasty. Ideas?
66 degrees is very low, so much so that the system might not be functioning correctly. The first thing you should probably check is to take a resistance reading with an Ohmmeter to see whether or not the heating elements or the thermostat might be at fault. Additionally you can check the thermostat's temperature setting to make sure that it's set to operate based on the floor's temperature and not the ambient temperature in the room. It is also possible that heating system was installed incorrectly compared to the functioning one (it could be too far below the floor's surface or the heating elements could be space too far apart) but hopefully that's not the case as there's not much that can be done short of replacing it.
So how do you check the thermostat setting to be sure it's detecting the floor's temperature & not the ambient temp?
That's a great question! Each thermostat will be different so you'll want to refer to their respective install or operation manuals but here's a quick video that will show you how to switch from ambient to floor temperature for our nSpiration Series of radiant heating thermostats: https://www.warmlyyours.com/video-media/switching-modes Hope that helps!
We typically turn the system off for the warmer months (April - Nov) and turn it back on when it gets cold. System has been working without issue for many years. Tried to turn it on a week ago or so and thermostat did not respond. Reset the GFCI that controls the circuit, everything else on the circuit works properly, no response from the thermostat. Is there a reset button, or protocol? If not, is there a recommended method to determine the issue?
Thank you very much for the question. If the thermostat has power supplied to it and it's on but you're still not getting any feedback from the thermostat then it's possible that the transformer in the thermostat has failed. If this is the case, then the thermostat will need to be replaced. If you have any questions about this, please don't hesitate to give us a call at 1-800-875-5285. Thanks again for reading!
Love our warm floors, unfortunately the unit stated to "click" every few seconds and we can't figure out what's wrong
Thank you so much for reading and for taking the time to submit a question. It's normal for a floor heating thermostat to make a clicking noise but it certainly shouldn't be making that noise every few seconds. It sounds like you might have an issue with the thermostat but it would be best to reach out to our 24/7 Tech Support Hotline at 1-800-875-5285 so they can try to help troubleshoot/diagnose the issue with you. Hope that helps!
How can I test my thermostat to see if it’s working properly? Heat is not turning off when the set temperature is reached. Could it be the temperature sensor?
Thank you so much for taking the time to reach out with this question. It's hard to say what the issue is because we'll need to know which thermostat you have but from what you've outlined, it's unlikely to be an issue with the floor sensor since it sounds like the thermostat is still displaying a temperature. It could be a failing relay or a settings issue but we'd need more information to conclusively diagnose the issue. You can call 1-800-875-5285 and speak to our 24/7 Technical Support Team to try and get to the bottom of the issue. Hope that helps!
I bought a replacement thermostat from your company about 6 years ago and everything has worked fine. A week ago, the floor stopped heating even though the thermostat appeared to be working. ( I tried resetting breakers, etc) I am waiting on an electrician, but just today the floor started heating again. I am hoping that means there is nothing wrong with the wiring but it's just a thermostat issue. What do you think? Thank you!
Thanks for reading and for submitting this question! Based on the information you've provided, it does indeed sound like a thermostat issue (a good indicator is the intermittent operation of the heating system-- generally speaking an problems with the heating system itself will mean that the system won't energize at all). With the thermostat, the relays can become worn and slip in and out of their proper position so it can seem like the system is working properly but the control will most likely fail again. Replacing the thermostat should be just what you need. Hope this helps!
We had a warmly Yours heated floor installed in our master bathroom about 6 years ago. It has worked perfectly until 2 days ago. The thermostat is on and I’m able to set temperatures and programming, however, the floors are not being heated anymore. Can you tell me if this is a thermostat issue or what the problem could be?
Thank you so much for reaching out with this issue. Your best bet for help is going to be our 24/7 technical support hotline (1-800-875-5285) so please don't hesitate to reach out to them. That said, one of the first steps will be testing the cables for the actual heating elements with an ohmmeter to determine if the issue is with the heating elements. There might be a break in the circuit caused by damage to the cables. My offer a number of tools for identifying the problem area and this webinar might be a good resource for you to further identify what the problem might be: https://www.warmlyyours.com/en-US/video-media/tips-for-troubleshooting-electric-floor-heating-system-webiniar
Good morning, The temperature on the thermometer says 127 degrees. Its 40 degrees outside and around 60 plus inside. Floor is cold, as you can imagine. Help!
Thanks for taking the time to read and send in a question. If this is a new installation, it sounds like you have 2 floor sensors connected to the thermostat (instead of just one connected with the backup left unconnected). Remove the faceplate and check to see if 2 pairs of sensor wires are attached to terminals C & D on the base. If so, remove one pair. Hope that helps!